Xposed 开发之 UiAutomatorViewer 扩展

UI Automator Viewer 是一个 Android SDK 自带的工具,通过它我们可以非常方便的查看和分析 App 的 View Tree,这么好的一个工具,可惜五年没更新了,不过 这个工具是开源的,所以我们可以使用源码进行二次开发。

准备工具

配置环境变量

使用 Eclipse 导入项目,然后发现大片的报错,原因是找不到对应的依赖包,问题不大。

删除 build.gradle 里面 dependencies 的项目。

打开 SDK/tools/lib/ 目录,会发现有一堆 jar 包,我们需要的依赖包全都可以在这里面找到,但是这么多不可能全都是我们需要的,那么怎么知道我们需要哪些呢?

在这个目录下面找到 uiautomatorviewer-26.0.0-dev.jar 并以 zip 方式打开,找到 META-INF/MANIFEST.MF 这个文件并打开,将 Class-Path 里面的所有 jar 包和 SDK/tools/lib/x86_64/swt.jar (如果是 32 位系统则找 x86 目录)添加到项目的环境变量里面。

源码分析

我们觉得 Node Detail 里面的属性太少了,我们想往里面添加一些属性怎么搞呢?

MANIFEST.MF 文件里面可以得知入口类为 com.android.uiautomator.UiAutomatorViewer,找到该类的 main 方法:

1
2
3
4
5
6
7
8
9
10
11
12
13
14
public static void main(String args[]) {
// 如果在测试时提示找不到 adb,可以在该类里面的 getAdbLocation() 方法里面手动修改 toolsDir
DebugBridge.init();

try {
UiAutomatorViewer window = new UiAutomatorViewer();
window.setBlockOnOpen(true);
window.open();
} catch (Exception e) {
e.printStackTrace();
} finally {
DebugBridge.terminate();
}
}

在该类的 createContents 方法里面可以找到该 Window 里面的 Actions

省略分析过程,最后找到 com.android.uiautomator.tree.UiHierarchyXmlLoader 这个类,里面的 parseXml 就是解析 xml 的地方,找到这个地方干什么呢?

我们知道 UiAutomatorViewer 的原理是执行 /system/bin/uiautomator dump [--compressed] /data/local/tmp/uidump.xml 这个命令,然后将这个 dump 出来的 xml 文件 pull 到电脑上解析,然后再配上一张截图就可以展示出一个 View Tree。

如果这个文件已经 pull 到电脑上了,我们再想改变里面的数据就比较难了,我们可以在它执行 dump 命令的时候修改里面的属性,然后 pull 到电脑上只负责解析就行了。

仔细查看源码会发现,Node Detail 里面的属性并不是直接定义在 Java 代码里面的,是从 xml 里面循环读出来的,xml 里面有什么就展示什么,那么这些 xml 又是谁写的呢?

顺着 /system/bin/uiautomator 往下找,dump 命令对应的类为 DumpCommand,主要代码:

1
2
3
4
5
6
7
8
9
10
11
12
13
14
15
16
17
18
19
20
21
22
try {
UiAutomation uiAutomation = automationWrapper.getUiAutomation();
uiAutomation.waitForIdle(1000, 1000 * 10);
AccessibilityNodeInfo info = uiAutomation.getRootInActiveWindow();
if (info == null) {
System.err.println("ERROR: null root node returned by UiTestAutomationBridge.");
return;
}

Display display =
DisplayManagerGlobal.getInstance().getRealDisplay(Display.DEFAULT_DISPLAY);(Display.DEFAULT_DISPLAY);
int rotation = display.getRotation();
Point size = new Point();
display.getSize(size);
// 看这里
AccessibilityNodeInfoDumper.dumpWindowToFile(info, dumpFile, rotation, size.x, size.y);
} catch (TimeoutException re) {
System.err.println("ERROR: could not get idle state.");
return;
} finally {
automationWrapper.disconnect();
}

继续找 AccessibilityNodeInfoDumper.dumpWindowToFile

1
2
3
4
5
6
7
8
9
10
11
12
13
14
15
16
17
18
19
20
21
22
23
24
25
26
27
28
29
30
31
32
33
34
35
36
37
38
39
40
41
42
43
44
45
46
47
48
49
50
51
52
53
54
55
56
57
58
59
60
61
62
63
64
65
66
67
68
69
70
71
72
73
74
75
76
/**
* Using {@link AccessibilityNodeInfo} this method will walk the layout hierarchy
* and generates an xml dump to the location specified by <code>dumpFile</code>
* @param root The root accessibility node.
* @param dumpFile The file to dump to.
* @param rotation The rotaion of current display
* @param width The pixel width of current display
* @param height The pixel height of current display
*/
public static void dumpWindowToFile(AccessibilityNodeInfo root, File dumpFile, int rotation,
int width, int height) {
if (root == null) {
return;
}
final long startTime = SystemClock.uptimeMillis();
try {
FileWriter writer = new FileWriter(dumpFile);
XmlSerializer serializer = Xml.newSerializer();
StringWriter stringWriter = new StringWriter();
serializer.setOutput(stringWriter);
serializer.startDocument("UTF-8", true);
serializer.startTag("", "hierarchy");
serializer.attribute("", "rotation", Integer.toString(rotation));
// 看这里
dumpNodeRec(root, serializer, 0, width, height);
serializer.endTag("", "hierarchy");
serializer.endDocument();
writer.write(stringWriter.toString());
writer.close();
} catch (IOException e) {
Log.e(LOGTAG, "failed to dump window to file", e);
}
final long endTime = SystemClock.uptimeMillis();
Log.w(LOGTAG, "Fetch time: " + (endTime - startTime) + "ms");
}

private static void dumpNodeRec(AccessibilityNodeInfo node, XmlSerializer serializer,int index,
int width, int height) throws IOException {
serializer.startTag("", "node");
if (!nafExcludedClass(node) && !nafCheck(node))
serializer.attribute("", "NAF", Boolean.toString(true));
serializer.attribute("", "index", Integer.toString(index));
serializer.attribute("", "text", safeCharSeqToString(node.getText()));
serializer.attribute("", "resource-id", safeCharSeqToString(node.getViewIdResourceName()));
serializer.attribute("", "class", safeCharSeqToString(node.getClassName()));
serializer.attribute("", "package", safeCharSeqToString(node.getPackageName()));
serializer.attribute("", "content-desc", safeCharSeqToString(node.getContentDescription()));
serializer.attribute("", "checkable", Boolean.toString(node.isCheckable()));
serializer.attribute("", "checked", Boolean.toString(node.isChecked()));
serializer.attribute("", "clickable", Boolean.toString(node.isClickable()));
serializer.attribute("", "enabled", Boolean.toString(node.isEnabled()));
serializer.attribute("", "focusable", Boolean.toString(node.isFocusable()));
serializer.attribute("", "focused", Boolean.toString(node.isFocused()));
serializer.attribute("", "scrollable", Boolean.toString(node.isScrollable()));
serializer.attribute("", "long-clickable", Boolean.toString(node.isLongClickable()));
serializer.attribute("", "password", Boolean.toString(node.isPassword()));
serializer.attribute("", "selected", Boolean.toString(node.isSelected()));
serializer.attribute("", "bounds", AccessibilityNodeInfoHelper.getVisibleBoundsInScreen(
node, width, height).toShortString());
int count = node.getChildCount();
for (int i = 0; i < count; i++) {
AccessibilityNodeInfo child = node.getChild(i);
if (child != null) {
if (child.isVisibleToUser()) {
dumpNodeRec(child, serializer, i, width, height);
child.recycle();
} else {
Log.i(LOGTAG, String.format("Skipping invisible child: %s", child.toString()));
}
} else {
Log.i(LOGTAG, String.format("Null child %d/%d, parent: %s",
i, count, node.toString()));
}
}
serializer.endTag("", "node");
}

indextextresource-id 这些不就是 Node Detail 里面的属性么,我们要改变或者往里面新增一个属性怎么办,添加一行 serializer.attribute("", "background-id", "value");?那么问题来了,怎么添加?这里可是 framework 层的代码,虽然知道这部分代码在 /system/framework/uiautomator.jar 里面,但是代码被转成了 vdex 咋整啊,而且就算解决了这个问题那这个属性的值去哪里找?这一套整下来小白可吃不消,所以我们可以换一种思路。

参考其他的属性,发现基本上都是 node.getXXX,找到对应的 setXXX 方法,这里使用 Xposed 打印堆栈:

1
2
3
4
5
at android.view.accessibility.AccessibilityNodeInfo.setViewIdResourceName(Unknown Source:9)
at android.view.View.onInitializeAccessibilityNodeInfoInternal(View.java:8693)
at android.view.View.onInitializeAccessibilityNodeInfo(View.java:7699)
at android.view.View.createAccessibilityNodeInfoInternal(View.java:7658)
at android.view.View.createAccessibilityNodeInfo(View.java:7643)

多次测试后可以确定:那些 node.getXXX 获取到的值就是在 View.onInitializeAccessibilityNodeInfoInternal 这个方法里面设置的,这样一来就解决了如何获取自定义属性值的问题,我们有了这个 View 的对象实例,什么属性获取不到?

那么最后一个问题,我们怎么把它显示出来呢?

在不修改系统代码的情况下,我们可以这么玩,还记得上面留着一个坑么,UiAutomatorViewer 的源码我们不是还没动过吗,这下就该动手了。

源码修改

在修改源码前,我们需要明确我们要改什么?怎么改?

目的很明确,我们需要添加一些自定义的属性到 Node Detail 里面,怎么添加呢?比如用 json 再包一层:

首先编写 Xposed 模块将我们需要的属性和值添加进去:

1
2
3
4
5
6
7
8
9
10
11
12
13
14
15
16
17
18
19
20
21
22
23
24
25
26
27
28
29
30
XposedHelpers.findAndHookMethod(View.class, "onInitializeAccessibilityNodeInfoInternal", AccessibilityNodeInfo.class, new XC_MethodHook() {
@Override
protected void afterHookedMethod(XC_MethodHook.MethodHookParam param) {
View view = (View) param.thisObject;
AccessibilityNodeInfo node = (AccessibilityNodeInfo) param.args[0];
node.setClassName(view.getClass().getCanonicalName());
node.setVisibleToUser(true);
// 其他属性自行研究
try {
JSONObject json = new JSONObject();
long viewId = view.getId();
if (viewId > 0) {
json.put("resource-id", id2Hex(viewId));
json.put("resource-name", node.getViewIdResourceName());
}
int backgroundRes = (int) XposedHelpers.getObjectField(view, "mBackgroundResource");
if (backgroundRes > 0) {
json.put("background-id", id2Hex(backgroundRes));
json.put("background-name", view.getContext().getResources().getResourceName(backgroundRes));
}
node.setViewIdResourceName(json.toString());
} catch (Throwable th) {
th.printStackTrace();
}
}

private String id2Hex(long id) {
return "0x" + Long.toHexString(id);
}
});

然后稍稍修改一下 UiAutomatorViewer 解析 xml 的代码:

1
2
3
4
UiNode tmpNode = new UiNode();
for (int i = 0; i < attributes.getLength(); i++) {
tmpNode.addAtrribute(attributes.getQName(i), attributes.getValue(i));
}

修改后:

1
2
3
4
5
6
7
8
9
10
11
12
13
14
15
16
17
18
19
20
21
22
23
24
25
26
27
28
29
30
31
UiNode tmpNode = new UiNode();
for (int i = 0; i < attributes.getLength(); i++) {
if ("resource-id".equals(attributes.getQName(i)) && addExtNodeDetail(tmpNode, attributes.getValue(i))) {
continue;
}
tmpNode.addAtrribute(attributes.getQName(i), attributes.getValue(i));
}

private boolean addExtNodeDetail(UiNode tmpNode, String extNodeDetail) {
try {
JSONObject json = new JSONObject(extNodeDetail);

// 排序(可选)
Iterator<String> iteratorKeys = json.keys();
SortedMap<String, Object> map = new TreeMap<String, Object>();
while (iteratorKeys.hasNext()) {
String key = iteratorKeys.next().toString();
String vlaue = json.optString(key);
map.put(key, vlaue);
}

// 添加自定义的属性
Iterator<String> keys = map.keySet().iterator();
while(keys.hasNext()) {
String key = keys.next();
tmpNode.addAtrribute(key, String.valueOf(json.get(key)));
}
return true;
} catch (Exception ignored) {}
return false;
}

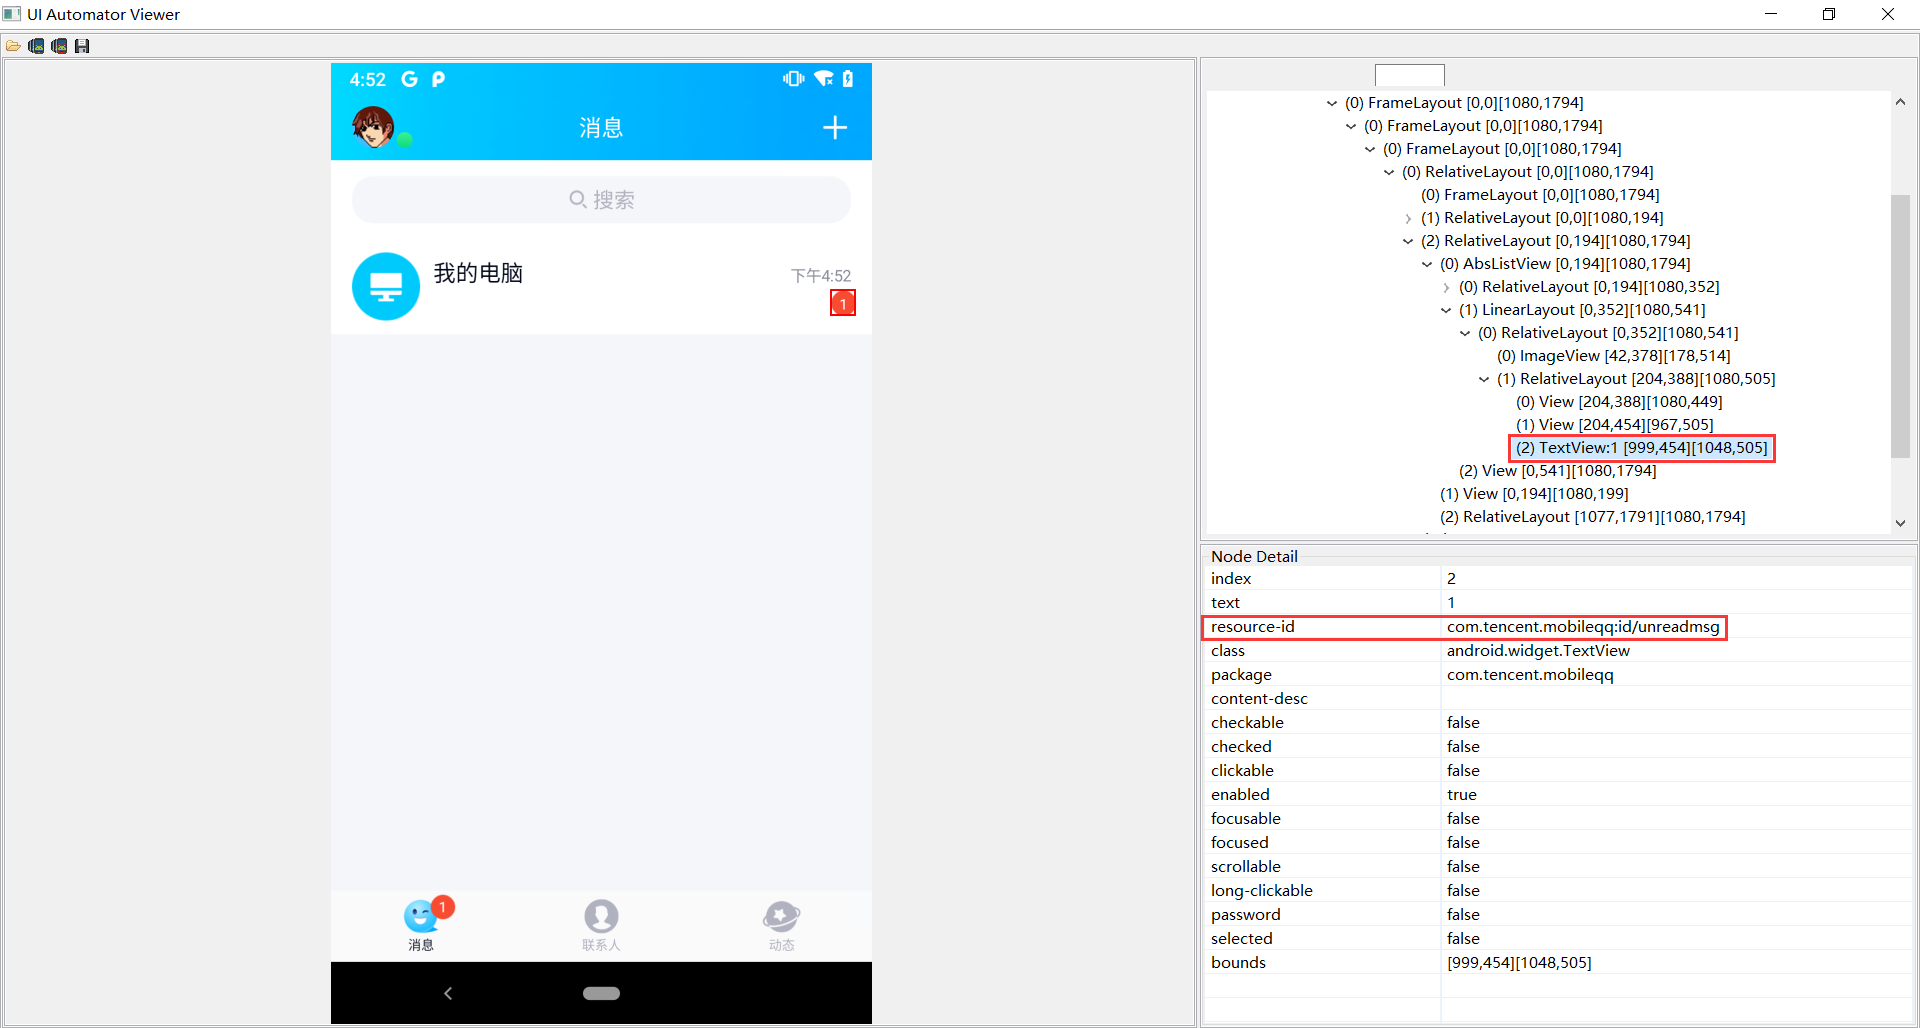
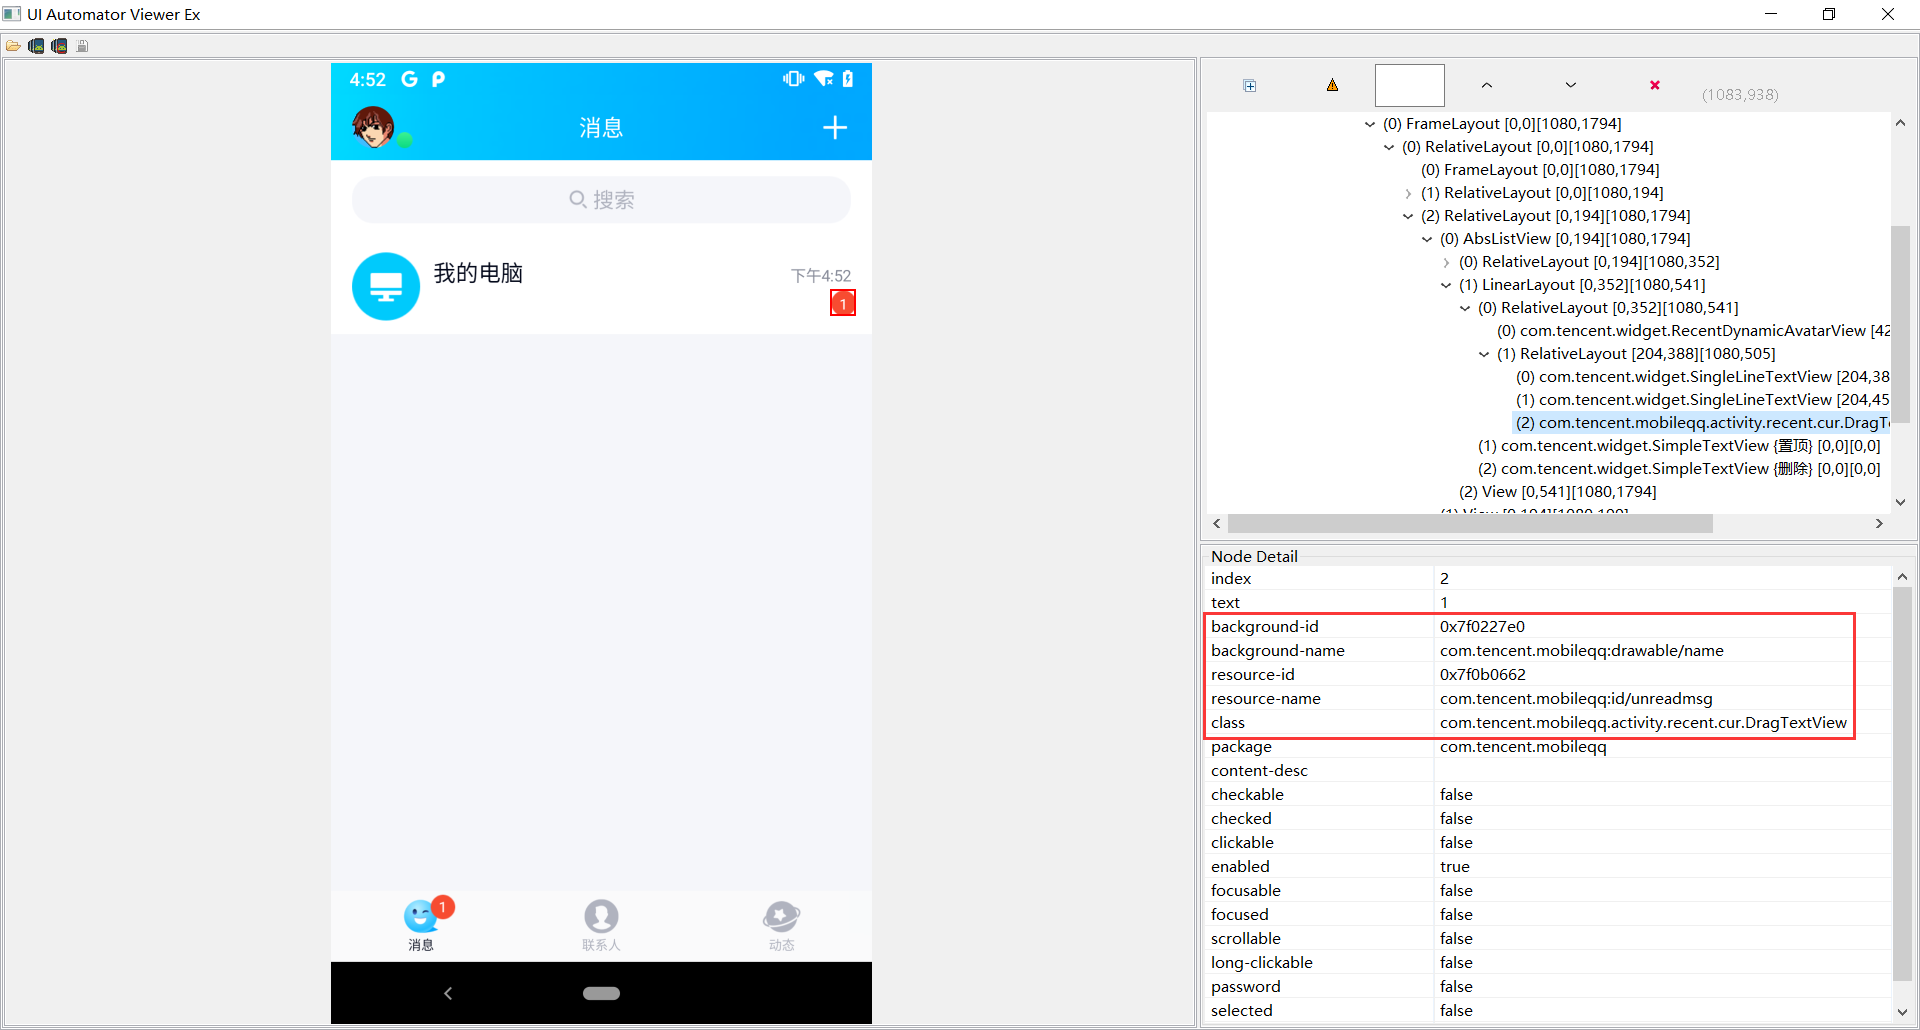
手机安装对应的模块,然后再使用这个二次编译的 UiAutomatorViewer 查看布局就行了,效果对比图(点击图片放大):

修改前 修改后
unmodified modified

写在后面

  • 听说用 idea 也可以编译,这个没试过,懒得折腾了。
  • 没有下载链接,代码都在这里了,自己动手丰衣足食。
  • 虽然还有一点点不优雅,但是起码实现了想要的功能,在别的优雅解决方案出来之前先凑合用吧。